A story about wood
Effects on wine
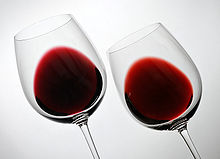

The effect of oak aging on red wine color: the above samples are both Penedès region Cabernet Sauvignon varietals; on the left, a two-year-old
cosecha; on the right a six-year-old
crianza. As the wine matures, its color shifts from deep purple or crimson to a lighter brick-red and takes on a more graduated appearance in the glass.
The porous nature of an oak barrel allows some levels of evaporation and
oxygenation to occur in wine but typically not at levels that would cause
oxidation or
spoilage of the wine. In a year, the typical 59-
gallon (225-liter) barrel can lose anywhere from 5½ to 6½ gallons (21 to 25 liters) of wine through the course of evaporation. This evaporation (of mostly
alcohol and
water) allows the wine to concentrate its
flavor and
aroma compounds. Small amounts of
oxygen are allowed to pass through the barrel and act as a softening agent upon the
tannins of the wine.
[3]
The chemical properties of oak itself can have a profound effect on the wine.
Phenols within the wood interact with the wine to produce
vanilla type flavors and can give the impression of tea notes or sweetness. The degree of "toast" on the barrel can also impart different properties affecting the tannin levels of the wine as well as the aggressive wood flavors.
[5] The
hydrolyzable tannins present in wood, known as
ellagitannins, are derived from
lignin structures in the wood. They help protect the wine from oxidation and
reduction.
[6]
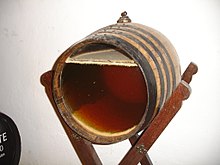
Oak barrel aging
sherry. It has a transparent front for people to see the process inside
Wines can be
barrel fermented in oak or they can be placed in oak after fermentation for a period of aging or maturation. Wine that is matured in oak receives more of the oak flavors and properties than wine that is fermented in oak. This is because
yeast cells interact with and "latch on" to the oak components. When the dead yeast cells are removed from the wine as
lees, some of these oak properties go with them.
[7] A characteristic of white wines that are fermented in oak include a pale color with an extra silky texture. White wines that are fermented in steel and then matured in oak will have a darker coloring due to the heavy
phenolic compounds that are still present.
[8] Flavor notes that are common descriptions of wines exposed to oak include
caramel,
cream,
smoke,
spice and vanilla.
Chardonnay is a variety that has very distinct flavor profiles when fermented in oak that include
coconut,
cinnamon and
cloves notes. The "toastiness" of the barrel can bring out varying degrees of
mocha and
toffee notes in red wine.
[9]
The length of time that a wine spends in the barrel is dependent on the
varietal and style of wine that the winemaker wishes to make. The majority of oak flavoring is imparted in the first few months that the wine is in contact with oak but a longer term exposure can affect the wine through the light
aeration that the barrel allows which helps to precipitate the phenolic compounds and quickens the aging process of the wine.
[8] New World Pinot noir may spend less than a year in oak. Premium
Cabernet Sauvignon may spend two years. The very tannic
Nebbiolo grape may spend four or more years in oak. High end
Rioja producers will sometimes
age their wines up to ten years in American oak to get a desired earthy cedar and herbal character.
[7]
OAK CAN BE A PARTNERSHIP WHEN INCORPORATED IN THE PROPER MANOR WITH THE WINE PROCESS AND CAN CHANGE THE ENTIRE PROFILE OF A WINES TASTE IF NOT APPLIED PROPERLY ,BUT IT IS TO EACH WINE MAKERS TASTE THAT THE OAK CAN BE STRENGTHEN OR BE MADE SUTTLE .THERE ARE MANY FORMS THAT IT CAN COME IN AS WELL AS TEXTURES AND TOASTYNESS AND LIQUID AND CAN BE INSTALLED AT ANY PART OF THE PROCESS . THE USE OF OAK IS PROFILE ELEMENT AS WELL AS A TASTE ENHANCER


") (I promise!)
(I promise!) 


.jpg")
.jpg")
.jpg")


 CONSTANT PRESSURE IS APPLIES AT ALL TIMES AND USING THE RIGHT SIZE CORKS HELPS.
