Sorry it took so long for me to get back to you guys. I had to get my notes and type up everything for you, but here is a detailed account of what we did:
WINE RACK<?

amespace prefix = o ns = "urn

chemas-microsoft-com

ffice
ffice" />
We used two 1” x 12” boards 8’ long to make the outside box.
We used four 1” x 12” boards 8’ long to make the inside box with shelves.
I did not want to make the outside box first then have to fit the inside boards in one-at-a-time. I was concerned about the angles and the difficulty of getting it correct the first time. I saw a lot of work doing it that way.
So we did it in steps.
Step 1
We took two 8’ board and cut them in half and made the outside box. When done we place that on the side.
<TABLE =MsoTableGrid style="BORDER-RIGHT: medium none; BORDER-TOP: medium none; BORDER-LEFT: medium none; BORDER-BOTTOM: medium none; BORDER-COLLAPSE: collapse; mso-border-alt: solid text .5pt; mso-yfti-tbllook: 480; mso-padding-alt: 0in 5.4pt 0in 5.4pt; mso-border-insideh: .5pt solid text; mso-border-insidev: .5pt solid text" cellSpacing=0 cellPadding=0 border=1>
<T>
<TR style="HEIGHT: 69pt; mso-yfti-irow: 0; mso-yfti-firstrow: yes; mso-yfti-lastrow: yes">
<TD style="BORDER-RIGHT: text 1pt solid; PADDING-RIGHT: 5.4pt; BORDER-TOP: text 1pt solid; PADDING-LEFT: 5.4pt; PADDING-BOTTOM: 0in; BORDER-LEFT: text 1pt solid; WIDTH: 81.1pt; PADDING-TOP: 0in; BORDER-BOTTOM: text 1pt solid; HEIGHT: 69pt; : transparent; mso-border-alt: solid text .5pt" vAlign=top width=108>
</TD></TR></T></TABLE>
Step 2
The inside box was calculated to be 37.25” length. 3 sections of 11 ¾ and 4 boards at ½”. That’s were we also made a mistake, using ½” for the board width’s, when actually the boards measured ¾” thick. This caused us to be off 1/8” four times.
<TABLE =MsoTableGrid style="BORDER-RIGHT: medium none; BORDER-TOP: medium none; BORDER-LEFT: medium none; BORDER-BOTTOM: medium none; BORDER-COLLAPSE: collapse; mso-border-alt: solid text .5pt; mso-yfti-tbllook: 480; mso-padding-alt: 0in 5.4pt 0in 5.4pt; mso-border-insideh: .5pt solid text; mso-border-insidev: .5pt solid text" cellSpacing=0 cellPadding=0 border=1>
<T>
<TR style="HEIGHT: 66pt; mso-yfti-irow: 0; mso-yfti-firstrow: yes; mso-yfti-lastrow: yes">
<TD style="BORDER-RIGHT: text 1pt solid; PADDING-RIGHT: 5.4pt; BORDER-TOP: text 1pt solid; PADDING-LEFT: 5.4pt; PADDING-BOTTOM: 0in; BORDER-LEFT: text 1pt solid; WIDTH: 87.15pt; PADDING-TOP: 0in; BORDER-BOTTOM: text 1pt solid; HEIGHT: 66pt; : transparent; mso-border-alt: solid text .5pt" vAlign=top width=116>
</TD></TR></T></TABLE>
Outside box step 1 complete
<TABLE =MsoTableGrid style="BORDER-RIGHT: medium none; BORDER-TOP: medium none; BORDER-LEFT: medium none; BORDER-BOTTOM: medium none; BORDER-COLLAPSE: collapse; mso-border-alt: solid text .5pt; mso-yfti-tbllook: 480; mso-padding-alt: 0in 5.4pt 0in 5.4pt; mso-border-insideh: .5pt solid text; mso-border-insidev: .5pt solid text" cellSpacing=0 cellPadding=0 border=1>
<T>
<TR style="HEIGHT: 21.5pt; mso-yfti-irow: 0; mso-yfti-firstrow: yes">
<TD style="BORDER-RIGHT: text 1pt solid; PADDING-RIGHT: 5.4pt; BORDER-TOP: text 1pt solid; PADDING-LEFT: 5.4pt; PADDING-BOTTOM: 0in; BORDER-LEFT: text 1pt solid; WIDTH: 30.05pt; PADDING-TOP: 0in; BORDER-BOTTOM: text 1pt solid; HEIGHT: 21.5pt; : transparent; mso-border-alt: solid text .5pt" vAlign=top width=40>
</TD>
<TD style="BORDER-RIGHT: text 1pt solid; PADDING-RIGHT: 5.4pt; BORDER-TOP: text 1pt solid; PADDING-LEFT: 5.4pt; PADDING-BOTTOM: 0in; BORDER-LEFT: #ece9d8; WIDTH: 30.05pt; PADDING-TOP: 0in; BORDER-BOTTOM: text 1pt solid; HEIGHT: 21.5pt; : transparent; mso-border-alt: solid text .5pt; mso-border-left-alt: solid text .5pt" vAlign=top width=40>
</TD></TR>
<TR style="HEIGHT: 21.5pt; mso-yfti-irow: 1">
<TD style="BORDER-RIGHT: text 1pt solid; PADDING-RIGHT: 5.4pt; BORDER-TOP: #ece9d8; PADDING-LEFT: 5.4pt; PADDING-BOTTOM: 0in; BORDER-LEFT: text 1pt solid; WIDTH: 30.05pt; PADDING-TOP: 0in; BORDER-BOTTOM: text 1pt solid; HEIGHT: 21.5pt; : transparent; mso-border-alt: solid text .5pt; mso-border-top-alt: solid text .5pt" vAlign=top width=40>
</TD>
<TD style="BORDER-RIGHT: text 1pt solid; PADDING-RIGHT: 5.4pt; BORDER-TOP: #ece9d8; PADDING-LEFT: 5.4pt; PADDING-BOTTOM: 0in; BORDER-LEFT: #ece9d8; WIDTH: 30.05pt; PADDING-TOP: 0in; BORDER-BOTTOM: text 1pt solid; HEIGHT: 21.5pt; : transparent; mso-border-alt: solid text .5pt; mso-border-left-alt: solid text .5pt; mso-border-top-alt: solid text .5pt" vAlign=top width=40>
</TD></TR>
<TR style="HEIGHT: 21.5pt; mso-yfti-irow: 2; mso-yfti-lastrow: yes">
<TD style="BORDER-RIGHT: text 1pt solid; PADDING-RIGHT: 5.4pt; BORDER-TOP: #ece9d8; PADDING-LEFT: 5.4pt; PADDING-BOTTOM: 0in; BORDER-LEFT: text 1pt solid; WIDTH: 30.05pt; PADDING-TOP: 0in; BORDER-BOTTOM: text 1pt solid; HEIGHT: 21.5pt; : transparent; mso-border-alt: solid text .5pt; mso-border-top-alt: solid text .5pt" vAlign=top width=40>
</TD>
<TD style="BORDER-RIGHT: text 1pt solid; PADDING-RIGHT: 5.4pt; BORDER-TOP: #ece9d8; PADDING-LEFT: 5.4pt; PADDING-BOTTOM: 0in; BORDER-LEFT: #ece9d8; WIDTH: 30.05pt; PADDING-TOP: 0in; BORDER-BOTTOM: text 1pt solid; HEIGHT: 21.5pt; : transparent; mso-border-alt: solid text .5pt; mso-border-left-alt: solid text .5pt; mso-border-top-alt: solid text .5pt" vAlign=top width=40>
</TD>
<TD style="BORDER-RIGHT: text 1pt solid; PADDING-RIGHT: 5.4pt; BORDER-TOP: #ece9d8; PADDING-LEFT: 5.4pt; PADDING-BOTTOM: 0in; BORDER-LEFT: #ece9d8; WIDTH: 30.05pt; PADDING-TOP: 0in; BORDER-BOTTOM: text 1pt solid; HEIGHT: 21.5pt; : transparent; mso-border-alt: solid text .5pt; mso-border-left-alt: solid text .5pt; mso-border-top-alt: solid text .5pt" vAlign=top width=40>
</TD></TR></T></TABLE>
Inside box step 2 complete
Step 3
I took the Inside box turned it 45 degrees, placing it on top or resting on the box in step 1
<?
amespace prefix = v ns = "urn
chemas-microsoft-com:vml" /></v
troke></v

></v
></v
></v
></v
></v
></v
></v
></v
></v
></v
></v
></v

las></v
ath><o:lock aspectratio="t" v

xt="edit"></o:lock></v

ape></v:></v
ape>
Excuse my arrows, did this free lance in acceories – but you get the point.
With the inside box resting on top of the outside box, we marked in 8 places where the boards had to be cut. With a square we just marked the board along the cut. This turned out to be quit easy. I was concerned – because this was a critical cut. Screw this up and all is lost. These cuts were done with a regular circular saw. We tried using a hand held jig saw, but the blade walked on us and was difficult to cut it straight, because you are cutting the wood at an approx 45 degree angle. The jig saw had a tough time with this cut. I needed some power and stability – circular saw.
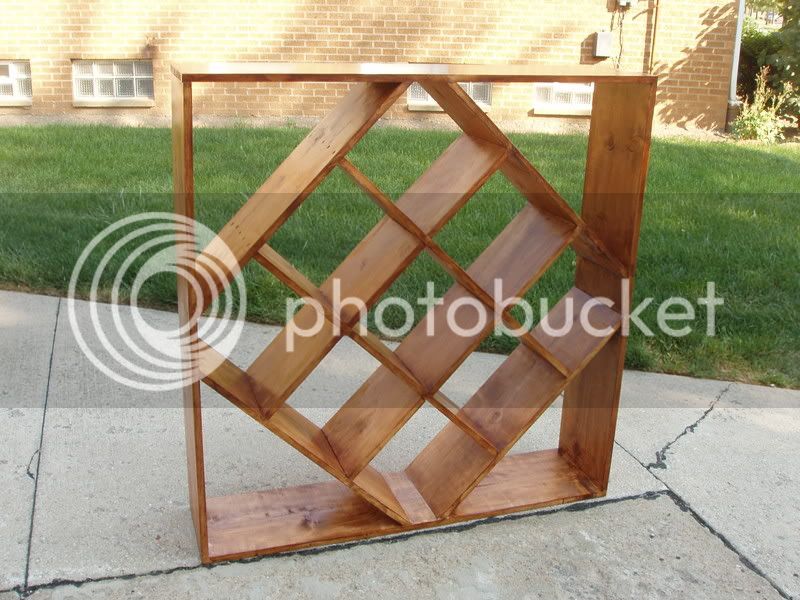
Final
With the four corners cut off, the inside box fell right inside the outside box. Glue and screw and we were all done.
Stained it next with:
The stain used was from “MINIWAX-Polyshades Stain & Polyurethane in 1 step”, the color is “antique walnut stain #340”
If I had to due it over again – what would I do.
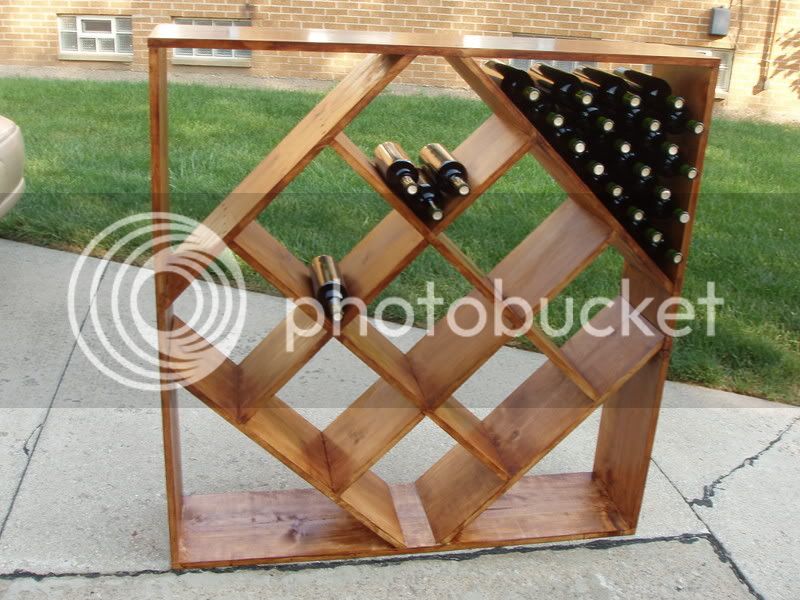
1) Make the boxes for the wine a little larger. If I remember the hypotenuse of the 11 ¾ boxes was about 16 ½”. I would allow more room and make it approximately 17 ½ (did not measure) to allow the middle row sufficient width to lay the bottles in. We lines up four bottles and measured from end to end, then allowed for an extra 1”. This was not enough. (oh well! Live and learn)
2) I might be tempted to stain all the material at least once first. Staining was a headache and took a lot of time. Especially getting in the joints.