Lessons learned in my first year

Winemaking Talk - Winemaking Forum

Help Support Winemaking Talk - Winemaking Forum:

This site may earn a commission from merchant affiliate links, including eBay, Amazon, and others.

don67

Junior
Joined
Jan 11, 2011
Messages
24
Reaction score
1
So after a year of making kit wines at home (and a friendly prompt from TxBrew), I thought I'd share some newbie wisdom in the hope that it will shorten the learning curve for other newbies.

1. Don't waste your money on a premium 6- or 8-week kit if you're going to drink it right away. Start with a cheaper 5-week kit (they mature more quickly) and let the good stuff age for at least 8 months. That's when they begin to mellow out and the different flavours really start to open up.

2. Just because you can buy buck-a-bottle wine kits at Costco doesn't mean you should. The finished product is thin and watery, almost like diet Koolaid. I don't know if all 4-week kits are like this, but I'm not willing to spend any more of my money finding out.

3. Buy a $15 decanter with aerator top, and use it on every bottle that hasn't aged at least one year. It makes a surprising difference, especially with some of the more complex red wines.

4. Don't assume that adding your own ingredients to a wine kit is guaranteed to make it better. I turned a nice Chardonnay into liquid pencil shavings by adding two extra pouches of oak cubes, and I fouled up a Merlot by adding fresh blackberries. The Merlot was so harsh and unbalanced even after a year of bulk aging that I ended up blending it with the aforementioned Kostco Koolaid, just to make both wines drinkable. :slp

5. Enjoy! It's a relaxing hobby that comes with its own community. You never know how many people are into wine & wine making until you get involved yourself.
 
2. Just because you can buy buck-a-bottle wine kits at Costco doesn't mean you should. The finished product is thin and watery, almost like diet Koolaid. I don't know if all 4-week kits are like this, but I'm not willing to spend any more of my money finding out.
IMO, the 4-week 2-pack Costco kits are among the worst ones out there. But some people like the results. As they say "there's no accounting for taste".

For example, I think that the 6-week Legacy Valpolicella is weaker in body/flavour than the 4-week Ken Ridge Classic Merlot. I haven't made any other Legacy or KRC reds, so I can't comment further. I mostly make better kits than both of those.

Steve
 
Last edited:
A few comments from a newbie who is getting a fast start.

Venture outside your comfort zone of wine styles. You will find some you did not know you would really like.

Don't waste your valuable time or tie up equipment on cheap kits.

Save the $50-70 premium for FOP, is is easy and cheaper do do your self.


Explain to the wife, that this is a hobby that does not cost anything in the long run. Savings over purchased wine will cover all costs over time. The more you drink, the quicker it pays for itself.:b

This is particularly the case in Canada where wine seems to cost about 50-60% more than it does in the states.


Don't hesitate to go a little overboard on initial production, it takes time to build a cellar of properly aged wines. If you just do 1-2 kits and wait until they are good before you do more, you will never build a cellar with properly aged wines. It also gives you better value for the money you spent on equipment. You want a good return on your investment don't you?
I would suggest it is better value in time and money to have 2- 3 kits going at the same time.

Shop for the best deal on carboys, and negotiate a qty price on 6. Believe me you will need them. Get airlocks and handles at the same time.

Always get a discount on your wine kits. My local WE store gives 10% off his already better than average prices, provided I buy two or more kits at the same time. Wine Kitz give 15% with three kits, unfortuanetly I don't like theirs as much.

Get a vacuum pump ( oiless ) and a drill attachment up front. It will make your life easy.

Keep a big spray bottle of K-meta handy.

Don't work in a carpeted area, there will be drips and little spills.

Use carboy tags or something similar to track your batches. Wine Kitz store here hands then out for free, but I print my own version now.

I keep a seperate spray bottle with weak k-meta and a couple of drops of food coloring in it for topping up airlocks. The light tint makes the water level easy to see.


Remember you are producing a consumable that will be enjoyed by other members of the family, and save money. It is not really any different than your wife spending all Sunday afternoon to make a great restaurant quality ( or better) meal.Therefore time spent in your wine shop should be deducted from any expected chore time!:i
 
All good advice.

I also like to have a brew hauler for each carboy. It is the thick, nylon netting with handles, for carrying the carboy safely.
I am starting to buy 3 gallon carboys, instead of mostly 6 gallon ones. One can experiment easier with two smaller batches and the lighter weight saves the back.

Buy some kind of bottling system; you will end up wasting much less wine at bottling time.

It has already been mentioned, but again, if you are serious about making wine, invest in a nice vacuum pump.
 
All good advice.

I also like to have a brew hauler for each carboy. It is the thick, nylon netting with handles, for carrying the carboy safely..

I have been using plastic file crates for my 6.5 gallon carboys. Got them at Staples for $5 each. I did fill them with 100# of dumbells and shook the crap out of them to make sure they would hold the weight. They work great!
 
All great ideas.

I actually ended up with 7 carboys, five of them generously provided free of charge by my going-out-of-business wine guy. That, plus 100 or so bottles on the rack, means never drinking young wine. A large portion of my inventory is now one year old, despite my wife and I enjoying a glass or two nearly every day and sharing with family and friends.

re: labels I run sheets of mini-labels through my laser printer. They go on the instructions, the carboys, the bottles... everything. They're easily removed with hot water and a quick thumb rub. No Goo-Gone necessary.

re: hydrometers. On my second one already. Think I'll pick up a spare next time I'm at the shop. They always break at the worst possible time.

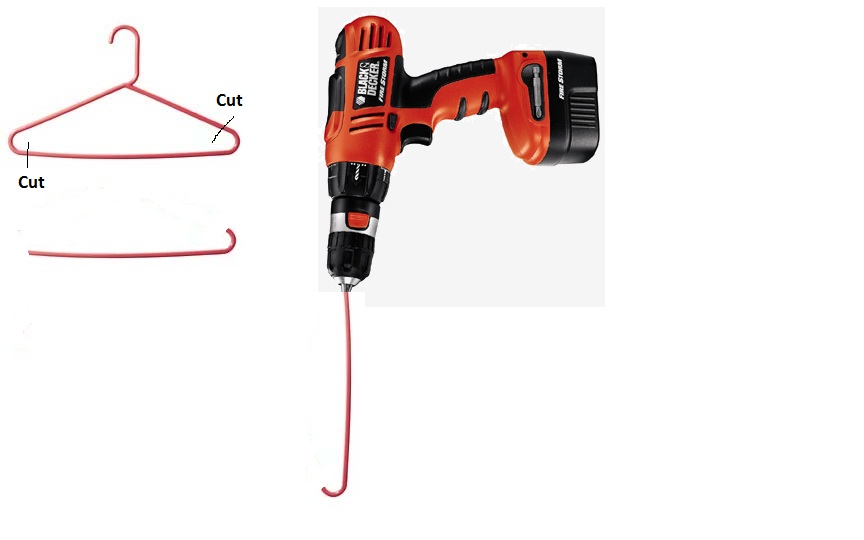
I had fun rigging my Foodsaver vacuum sealer to degass three carboys simultaneously, but ultimately found it quicker to simply drill the wine. No fancy $25 whip for me either... I MacGyvered a plastic coathanger into a y-shaped accessory that attaches to my Makita. Winemaking, it seems, has brought out my inner engineer. :db
 
Make sure that the table or shelf you keep your carboys on is VERY VERY strong!!!!!!!!!!
 
This is a great thread for folks like me who are just starting. thanks to all you seasoned vintners!
 
For my last few batches I have shaken, not stirred, the carboy to degass the wine. It works surprisingly well. Simply tip the carboy on edge, get a firm grip on the neck and body, and gently rock it back and forth several times over a two-day period. I like to finish with my foodsaver vacuum, just to be sure there is no more CO2.

As a bonus you leave the airlock installed during the degassing, which avoids any chance of oxygenation. You also reduce the presence of air bubbles caused by stirring, which creates the false impression of remaining CO2.
 
Always bottle sober.

Always move carboys and equipment sober.

When you sample for taste, spit out the wine if the above two will occur after your sampling.

A baggie of ground strong coffee will help refresh your nose and taste buds for more sampling if you sniff the aroma after they have grown dull.

If you do buy a cheap 6 gallon kit, make 5 gallons out of it. You'll be surprised how much better it is.

Don't be afraid to ferment almost anything.

Always save back juice for back flavoring.

If you think you have added enough sugar to backsweeten a sample, add half again more and see if you are correct before you bottle. Record your backsweetened SG for each wine you make, for reference in the future.

If you buy the commonly sold white rubber gallon jug drilled corks, wash them a few times in the dishwasher, or they could impart a rubbery taste to your wine.

It is impossible to "over-sanitize."

During fermentation and aging, keep wine batches separate from each other and do not comingle them or use unsanitized, unwashed equipment across batches. That way, a bad batch cannot infect a good one.

Buy at least one food safe BRUTE garbage can, 20 or 32 gallon size, for use as a primary. Yes, you will be making musts that big eventually.
 
can you show a picture please? the drill attached degasser cost some 20 bucks here

google is your friend...


Degassing+wand.jpg
 
Actually I left most of the hanger intact, forming it slightly with a heat gun.

One trick is to make sure it's balanced... a lopsided wand tends to shake out of control.

Another trick is avoiding messy kickback when pulling it out of the carboy. Purple spatter up the wall is not uncommon with this design.

2012-09-14 10.23.30.jpg
 
Last edited:
Back
Top