when good wines gone bad

Winemaking Talk - Winemaking Forum

Help Support Winemaking Talk - Winemaking Forum:

This site may earn a commission from merchant affiliate links, including eBay, Amazon, and others.

how many have used or tried using ZESTING


  • Total voters
    111
simple syrup

mike is right ,4 quarts of sugar 2 quarts of water = 4 quarts of simple syrup...............usually but not always the standard kit could take 2 quarts of simple syrup to bring the sg up to 1.10,that all depends on what you sg is to start out with, go slow 1 quart at a time stir very well and let it settle down then take a reading to desired abv.

understand this: depending on what phase of the process your in PRIMARY to boost the sg and potential alcohol in the end OR finishing to BACK SWEETEN ,the proper chemistry is still required you can't escape the process.

simple syrup is a clean way to deliver what's desired in your process and should be a part of your tool box all the time.........................:br
 
Last edited:
simple syrup mix

WORKING WITH SIMPLE SYRUP IS EASY AND CAN TAKE A SIMPLE PRODUCT AND PLACE IT ON ANOTHER LEVEL, IF USED CORRECTLY,FOLLOW THE PROCESS 4 QUARTS OF CANE SUGAR TO 2 QUARTS OF WATER THAT'S WHAT I USE AND IT WELL BALANCED.........................:br..NET RESULT IS 4 QUARTS OF SIMPLE SYRUP ,THIS PRODUCT HANDLED CORRECTLY WILL LAST A VERY LONG TIME AND IS A TOOL YOU SHOULD HAVE IN YOUR TOOL BOX AT ALL TIMES..................:mny.WHETHER YOUR CAPITOLIZING OR BACKSWEETENING SIMPLE SYURP IS THE KEY.

20130516_190450.jpg

20130516_190830.jpg

20130516_191103.jpg

20130516_191120.jpg

20130516_193125.jpg

20130516_193117.jpg

20130516_193300.jpg

20130516_193336.jpg

20130516_193521.jpg

20130516_193604.jpg
 
Zesting in the beginning

:HB
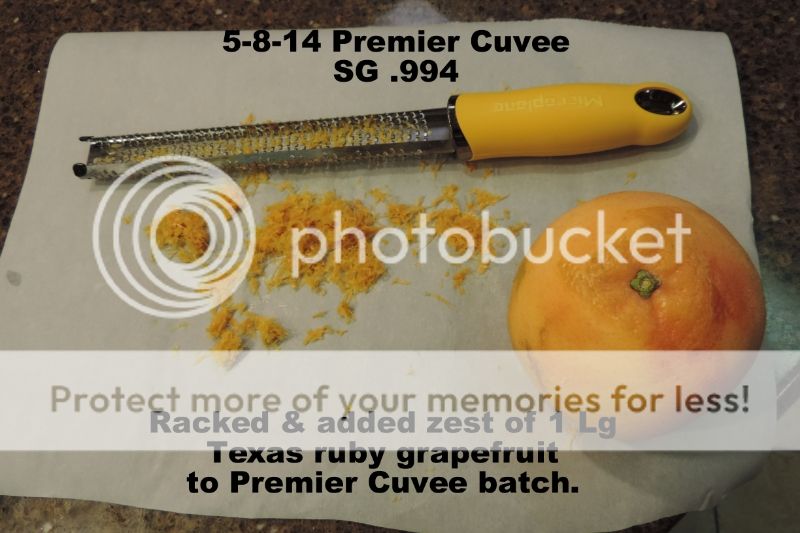
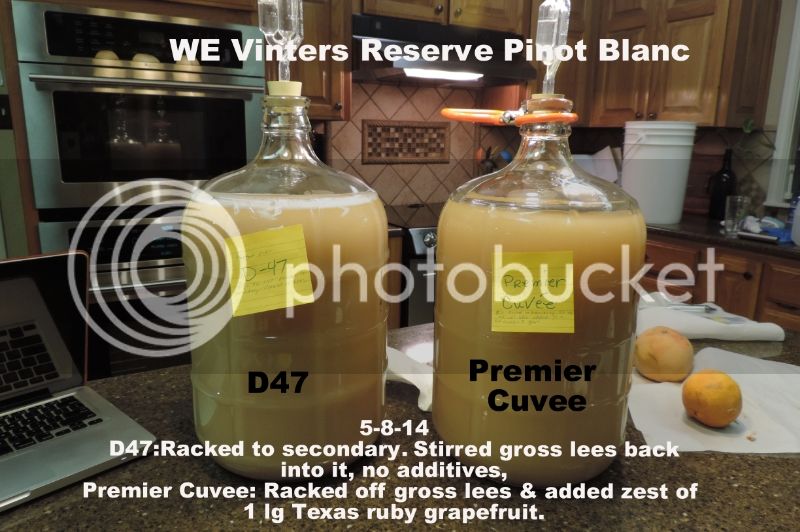
ZESTING FOR FLAVOR.................:b THINK OUTSIDE THEBOX FOR THAT ADDED DEMINISON TO YOUR WINE..BELOW ARE JUST SOME OF THE EXTRACTS YOU CAN MAKE AND USE IF YOU......................:db THINK OUTSIDE THE BOX.......................:tz

P1030099.jpg

P1030102.jpg

P1030115.jpg

P1030116.jpg

P1030104.jpg

P1030111.jpg

P1030109.jpg

P1030106.jpg

P1030105.jpg

P1030112.jpg
 
Last edited:
I love the zesting and simple syrup techniques. Great information and photos' Joe.

Now, how about some advice on the application of these products in wine making. :D
 
zesting and extracts

well Dave ,the use and extracts have been around as long as man has made alcoholic beverages, just the same way as using flowers and herbs as a additive.


lets take lone star Lori as a example with her latest adventure, she's making a white non- descriptor wine with two different yeast, I suggested to her to add grapefruit zest to one batch ,it would add lift and brightness to the wines overall taste as well as adding a slit taste of fresh fruit.

on the other hand the coffee port I made had not just the normal kit additives but instant coffee, as well as coffee bean extract Extracts can play a very tasteful role in any wine it's how you apply it and when, just like a fpac usually the fpac comes in in the third stages of the mix there is know law stating when you can add a extract, it's up to you and the taste profile your trying to achieve,
example, adding a touch of vanilla bean too a zinfandel, or plums to a PINO NIOR, dark cherries to a Cabernet,raspberries to a Shiraz, you can almost do the same with extracts you just need to think outside the box and be prepared to take taste chances.........:br
 
Last edited:
Ok Joe, I took your advice and added some grapefruit zest to the Pinot Blanc with the Premier Cuvee yeast. I chose that batch because it has a stronger citrus note than the one with the D47. It's almost lemony. Can't wait to see what the zest does.

If anyone wants to follow the process on this split batch, you can see the entire thread here:

http://www.winemakingtalk.com/forum/f84/thinking-outside-box-9155/index40.html#post510117

DSCN1001.jpg


DSCN1004.jpg
 
Just to confirm: You added zest in secondary, right? I'm considering using some zest with a Viognier bucket. A very small amount of orange.
 
Yes. I added it right after I transferred it to the carboy. The SG was .994. Normally I make my additions sooner, at about 1.010, but this one fermented fast and got away from me.
Since I haven't used zest before and this is only a 3 gal batch, I chose to only use 1 grapefruit. If it doesn't seem to be enough, I can add more later. My gut feeling is that it will be plenty.
 
zesting

excellent move I sure when alls said and done the brightness will be there, stay the course.:u

THINGS TO CONSIDER,MOST WHITE WINES ARE A BLANK CANVAS JUST WAITING FOR IDEAS TO IMPRINT ON THEM..:h
 
Last edited:
Cellos for fun

SIMPLE FORMAT FOR LEMON CELLO...:wy


Join Date: Nov 2007
Location: franklin township, nj
Posts: 3,337
Liked 241 Times on 194 Posts
Likes Given: 4


icon1.gif
Zesting in the beginning
LETS PLAY..............................
fireworks2.gif
Let's make a Cello! IMAGINE THE FLAVORS!
We are only making 2 bottles of lemoncello so that we can show you the process we use.
What you will need:
2 wine 375 wine bottles
mixing vessel (we used a clear pitcher)
wooden spoon
funnel
everclear lemon extract (we made this about month ago and stored in a Ball jar)
simple syrup (made with dissolved cane sugar)

Process:
First, we filled both of the 375ml wine bottles 3/4 the way full with simple syrup, this gives us our volume. We then dumped this into the pitcher.
Next, we filled each of the (2) 375ml wine bottles 1/2 way full of the lemon extract. Then dumped this into the pitcher.
Stir well. (you will see that it seperates because the simple syrup is heavier than the alcohol/extract.)
Once we tasted it and found that it tasted fine as is, we added 2-3 drops of yellow food coloring and gave it another stir. (Some people may ask why add food coloring, we added it to make it more eye appealing. Most commercial lemon cellos do HAVE some type of coloring in them.)
Then we filled the 375ml bottles and corked them. We had enough left over for a shot each to cheer our victory!

1 Bar Jars.jpg

2 fill both jars with syrup.jpg

3 Add to mixing vessel.jpg

4 fill both with extract.jpg

5 Add to mixingvegges.jpg

6 it will seperate.jpg

8 add 2-3 drops yellow food dye.jpg

9 final stir.jpg

10 bottled.jpg
 
Coffee cello

above is the lemon cello ,follow the same methods only using coffee extract and he basics cello recipe.........................:wy
Espresso Chello
What we used:
9 cups espresso (this is your base) (1 ball jar)
½ ball jar simple syrup
½ ball jar coffee bean extract
½ cup everclear
What to do:
Add your base (all the espresso, dump in the pot.)
Next , add the coffee bean extract (little at a time, to taste).
Then, add simple syrup to taste, a little at a time.
The, taste to see if the alch. Is good. Most likely, it will need more.
Add everclear to taste, make sure to not put too much that it overpowers.
Once you are happy with the results, pour back into (2) clean ball jars and put the lids back on. It should sit a day or so to blend. Then you are ready for bottling.


1 Our Espresso base.jpg

2 add coffee bean extract slowly.jpg

3 don't add the beans.jpg

4 stir up good.jpg

5 add a little more extract to taste.jpg

6 then add simple syrup to taste.jpg

7add more everclear to taste.jpg
 
Simple syurp

A PRIME TOOL FOR EVERYONE'S TOOL BOX....................FOR BOOSTING THE ABV LEVELS AND FOR BACK SWEETING LEARN TO USE THE TOOLS OF THE TRADE....:u

BASIC LY IT'S A TWO TO ONE MIX SUGAR TO WATER..

Feedback Score: 0 reviews


Join Date: Nov 2007
Location: franklin township, nj
Posts: 3,351
Liked 248 Times on 199 Posts
Likes Given: 4


icon1.gif
Simple syrup
simple syrup is a key component in wine making weather your boosting the alcohol level or doing a capitalizations process (same thing) or just back sweetening at the finish ,simple syrup is fundamentally a more assured way to go and the process is simple this is a tool every wine maker should have available in his or hers tool box.To make Simple Syrup
We use Pure Can Sugar Only.

Simple syrup is a 2 to 1 blend (2 parts sugar, 1 part water)
We use ball jars as a measuring device because that is what I store it in.

So, this batch was 4-to-2 blend. (4 ball jars sugar, 2 ball jars water)
which equates to 4 full ball jars of simple syrup ready to use anytime.

First:
Measure out sugar to water ratio.
Next, add sugar to a large metal pot.
Now is a good time to take the ball jars and place them in the sink in a tray and have your lids ready and your hot mittens (cooking gloves, whatever you call them!)
Make a well in the center, then dump the water into the well and stir until blended (not disolved yet.)
Next, turn the heat up to high. Stirring frequently until you see it start to clear a little with a light foam on top. Once you see this, you want to stir it constantly. It will go from simmer to rapid boil almost instantly when it's ready to go. Continue to stir, being careful to NOT GET ANY ON YOU! It will take your skin off, it's very HOT!
With a metal spoon you should see through the simple syrup just like water, it will be clear. You will know you are done when this happens. (It will be at a hard boil when this happens.)
You should already have your ball jars clean and ready to go. I place mine in a tin tray in the sink and fill the tray half way up w/ water. I place a wide mouth funnel inside the jars and take the boiling hot simple syrup and CAREFULLY fill the ball jars. Use your mitten and put the lids and rings on the jars and tighten them up. Turn the cold water on them and allow it to run in the tray. The process of the water cooling down the simple syrup will cause a vacuum in the jars and you will hear a "POP!". This will seal your ball jars and by the morning they will be cool and ready for you to handle. This simple syrup will stay good indefinitely.
This is how I make simple syrup. Another tool in the toolbox.


1 sugar.jpg

2 our 2 to 1 ratio.jpg

3 dump water into well.jpg

4 stir frequently not yet dissolved.jpg

6 it will boil and clear.jpg

7 hard boil.jpg

5 put jars in sink.jpg

8 carefully fill jars.jpg

10 add lids and tighten.jpg

11 add water and seal jars.jpg
 
Last edited:
Tools in the tool box

GO BACK AND REVIEW THE BASICS OF CELLOS AND MAKING SIMPLE SYRUP,THESE ARE KEY ITEMS FOR YOUR TOOL BOX EXPLORE WHEN AND HOW TO USE THEM ,ALONG WITH KMET,SORBATE. HAVE A BETTER UNDERSTANDING/ THE DIFFERENCE BETWEEN SANITATION AND CLEANING AND HOW TO DEVELOP A GOOD PLAN AND HOW TO EXECUTE THE PROCESS WITHOUT SHORT CUTS,PATIENTS AND UNDERSTANDING OF THE WINE AND IT'S OUTCOME IS A COMBINATION WITH YOU AND NATURE AS WELL AS MAN MADE ELEMENTS ,WHEN YOUR COMFORTABLE WITH THESE STEPS THEN YOU'LL HAVE A BETTER UNDERSTANDING OF WHAT AND WHY , WHEN YOU START TO TWEAK KITS ,FRESH FRUIT OR GRAPES,EVERY WINEMAKER OUT THERE WEATHER PRO OR CELLAR DWELLAR TWEAKS THAT'S THE NATURE OF WINE MAKING ,IF NOT WE WOULD BE DRINKING ...................:s THINK ABOUT IT?
 
Last edited:
Cornocopia Chardonnay Kit
This kit we purchased off Amazon for ~$45.00 shipped. This kit is contained the chardonnay concentrate, as well as labels, corks, caps, packets of yeast, sorbate, bentonite, k-met, and chitosan. This kit contains the essentials for any new winemaker (minus the basic equipment that is needed.) Note: This is my own modification to this kit. I always strive to improve the quality of kits to suit my own tastes. This is just our way of showing you of how to think "outside the box".

What we added:
1 cup American Oak cubes
2 ball jars of simple syrup
Spring Water

The steps:
First, we added the bentonite and ½ gal. warm water and stirred until dissolved.
Next, we added the packet of chardonnay juice and then topped up to 6 gallon mark on our primary fermenter.
Then, we took an SG reading. The kit as is, came to 1.080. We wanted our SG reading to be at 1.10, so we added the ball jars of simple syrup, one at a time (and took readings in between). We ended up using both jars and this brought us up to our desired SG reading: 1.10. We wanted this specific SG reading because we do not want fermented fruit juice, we wanted wine.
Next, we gave the bucket a good stir, added the yeast, and then added our American Oak cubes.
The last step: We document the contents on our tag, hang it on the bucket, and drape a towel over the top. Now we wait.

1 contents.jpg

2 box.jpg

3 bentonite.jpg

4 add juice.jpg

5 rinse bag.jpg

6 top up to 6 gal.jpg

7 first SG reading.jpg

8 add simple syrup.jpg

9 second SG reading.jpg

10 instructions SG reading.jpg
 
Last edited:
Muscato queen of the italian whites

THIS IS A GREAT WHITE WINE TO HAVE IN YOUR INVENTORY VIOGNIER,THEY WILL COMPLIMENT ANYONES CAST OF PLAYERS.

White Moscato​
Here’s the process:
Add bentonite to the primary fermenter with ½ gallon warm water and stir it up until dissolved
Open up the large juice bag and dump it into the primary bucket
See the "musk" left over? Rinse that out w/ a little water. You don’t want to waste this, it’s extra yeast food and flavor!
Stir up everything in the bucket until well mixed up, then take your Specific Gravity (SG) reading. Ours reads 1.070.
Sprinkle the yeast on top and let sit, don’t stir. We are using Lalvin 1118. Moscato typically does not have oak. We are adding oak tannins and white California Sun-Maid raisins into the secondary to build up the mouth feel. (This we will show in pictures and text later on in the process.)
Now you cover the bucket with a towel so that your yeast can breath but so that dust and debris do not fall into your bucket. (If you have small children, I recommend putting a lid on it w/ a hole so that it can breath. Children and buckets of liquid do not mix.)
Now that we are done our primary fermentation and our Moscato is dry (our SG read 1.012, sorry I did not take a picture. FYI: This reading was right on target with the manufacture- Winexpert. We are right where we need to be) it is time for secondary fermentation.
Notice all the white, rehydrated raisins floating on top? We are going to strain them off the top and then rack this moscato down to a 6 gallon carboy.
Now it’s time for stabilizing. The kit came with a packet of potassium sorbate, K-Meta, and Chitosan for clearing. Add the packets of sorbate and K-met first, then the clearing agent. Then give your carboy a good stir.
Next, we add nitrogen gas to the carboy. (This is not necessary but I do it as a precaution. ) Now the hard part.. waiting..
As always, clean up your carboy right away so that it doesn’t get funky.
Stay tuned. The next post for this Winexpert Moscato kit is to check to see how clear it is. If it needs more clearing, We will apply more Super Kleer as required. (My preference of clearing agents.) Once it’s clear then it’s time for the F-Pak that came with the kit. Once it is clear and the F-pak is applied then we bottle, cork, and label. Again, the post for this (with pictures) is forth-coming. Cheers!


1a Moscato kit.jpg

2 bentonite.jpg

3 open juice.jpg

4 add juice.jpg

5 clean out must.jpg

6water to must.jpg

7 add water to 6 gal.jpg

9 yeast.jpg

10 add yeast.jpg

11 cover and tag.jpg
 
raisins in the wine

Follow the process...
,
DID YOU NOTICE THE GOLDEN RAISINS IN THE SECONDARY NOT THE PRIMARY,OR HOW CLOUDY THE WINE HAD BECAME,THE REASONING FOR THE RAISINS WAS TO ADD A BETTER MOUTH FEEL TO THE FINISH AND IT DID,BUT THE CLOUDY WINE PART NOW THAT BECAME A PROBLEM EVEN WITH SUPERKLEER. THE HAZE STILL CONTINUED NOT UNTIL I DID A COLD STABILIZATION ON THE WINE FOR 3 WEEKS DID IT PRECIPITATE OUT, SEE THE CLARITY OF THE WINE BEFORE AND THEN AFTER,SOMETIMES IT HAPPENS TO A WINE WITH A LOT OF PECTIN IN IT AND I BELIEVE THAT THE MUST CONTENT WAS EXTREMELY HEAVY AND THATS' WHY A LOT OF PEOPLE HAD THE SAME PROBLEM,THIS TURNED OUT VERY NICE MORE OF A SEMI-DRY TO SWEET FINISH .

12 Moscato raisins.jpg

13 moscato straining raisins.jpg

14 moscato racking.jpg

15 moscato stabilizing 1.jpg

16 moscato clearing.jpg

17 stirring moscato after stabilizing.jpg

Nice and clear Moscato 9 12 13.jpg

IMG_20140317_125521904 - Copy - Copy.jpg
 
Last edited:

Latest posts

Back
Top