Plumbers advice needed!

Winemaking Talk - Winemaking Forum

Help Support Winemaking Talk - Winemaking Forum:

This site may earn a commission from merchant affiliate links, including eBay, Amazon, and others.

ibglowin

Moderator
Staff member
Administrator
Super Moderator
Joined
Jul 7, 2009
Messages
28,260
Reaction score
53,200
Location
Northern Nuevo Mexico
We are in the middle of a hall bathroom remodel. We are keeping the original cast iron tub as it was still in great shape and they just don't make them like this anymore as they say. I would like to put in a new tub drain. The old one leaks if you want to take a bath and SWMBO likes the new popup ones they make these days.

Done some reading online. This drain could more than likely be original and 40 years old now. I have lived in this house for 14 years. It appears these things can be a sumbitch to remove and you can actually damage the tub if you don't have the proper tools/techniques to remove this.

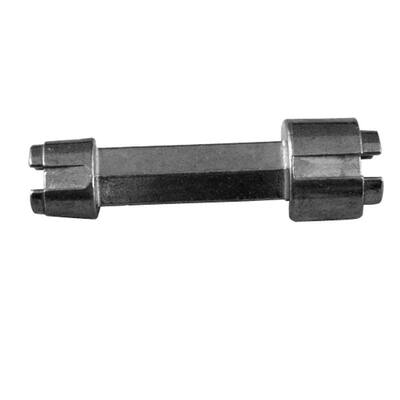
I have seen a really nice drain removal tool on Amazon but its $60. They make cheaper ones but the metal breaks easily if you put too much torque on them.

As this is likely to be a one time deal, is it best to call a pro out to do this?

Anyone know of any tried and true tricks or adapters that work but don't cost $60?

Thoughts?

TIA.
 
For an extra $20, you could probably get a plumber to make a house call and ensure that it's done right the first time, as opposed to having a $60 tool on hand that you may never use again.

I'd look into it further, but it appears to me that you've done all the research you need -- you just aren't sure of yourself. Call around to your local plumbers and get them to give you a quote on the phone. If they won't quote you without coming out, call the next one that will.
 
I would pay $80. Not sure I can get one out for that is the only problem...... Those guys are not cheap (never have been for that matter!)
 
Mike, I've done a lot of plumbing in my time. I've been in my house 12 years and it was new when we bought it. Every time I try to change a faucet or anything it takes 3 trips to the hardware store. The plumber put all wierd fittings in instead of standard ones probably because he got some deal. Anymore I cut or sweat everything off right at the joint and start fresh.

What I'm suggesting to you is call a plumber. He'll have everything in his truck probably and be in and out in a 10th of the time it'll take you. The job you're thinking of doing is probably going to be a b!tch. Spend your time on getting the right product for a good price.

I'm headed down to Lowes now but instead of hijacking this thread I'll post later.
 
I hear you. I am also putting in new shower valve and fixtures. The old is soldered in of course. The new will be installed by me using "Shark Bite" fittings and hoses! :sm
 
If you are talking about removing the drain that is IN the tub, you cn use 2 screwdrivers. Cross them like an X and insert into the drain. then you can unscrew the drain
 
I generally use a pair of needle nose pliers with vice grips applied transverse to them to unscrew the drain fitting, but I've never worked on a cast iron tub so have no idea how seized it can get.
 
Removing the old drain will not be easy, 9 out of 10 times I end up using a saw to cut drain. There is a trick to this, use the sawzall on the bottom side of the tub close to the top of foot, this removes about 98% of the drain the a small chisel will remove the rest of the potmetal ring. Now the only real issue will be get the New drain to cover old drain marks...
 
Just to make sure were all on the same page here. I want to install a new one of these:

10874.jpg


Not really the drain I guess but a new drain stopper!
 
Just to make sure were all on the same page here. I want to install a new one of these:

10874.jpg


Not really the drain I guess but a new drain stopper!

Well not sure if New drain will Thread into old Drain, that will be the issue. Thats why you may end up replacing whole drain...
 
How could it not. Isn't pipe thread pipe thread?

The new ones all appear to be the exact same diameter but have not measured just yet.
 
How could it not. Isn't pipe thread pipe thread?

The new ones all appear to be the exact same diameter but have not measured just yet.

Not a chance! Especially when you try to do it yourself, but you could get lucky. Every time I try to change a faucet and add new supply lines I am always dealing with fine threads and coarse threads not matching up. Becareful what/where you buy. A lot and the connections or valves are made from cheap metel the easily strips out or splits. You're pretty safe at the two big box stores or a plumbing supply house.
 
Bought some good "anti-seize" spray at the local hardware store. These guys have been around for 40 years and they know what to stock parts wise (that fit) for our local housing. I sprayed around the outer drain ring in the tub and about 10 sends later I saw a nice amount draining from the outside bottom of the drain valve in the tub.(a good sign I think). Will let that soak in overnight and then try and break it free tomorrow.
 
Depth of thread, course or fine old and new... Thats why not :) what we want to happen and what will are 2 different things. If your talking a old bearclaw tub a lot of the things back then where not Standard as they are today. I hope it works... Im just say thats all. :)
 
You'll be fine on the drain. The chief area of concern is the depth of the drain flange, so it will go all the way through the tub. Almost all are just fine. Apply a ring of plumber's putty to the top of tub where the flange meets it. Put the rubber ring on the bottom side of tub. They often have a paper gasket, too. Be sure to use that between the rubber and the nut; it allows the nut to slide over the rubber washer while tightening. Tighten snug but not overly tight; putty will be forced out around the flange. Peel off excess putty.

On yer soldered fittings from an earlier post, please solder them back into place. It is easier than swatting a bug.

Use a tubing cutter and sandpaper on the ends; dry fit everything and draw a line with marker across the joints to keep proper orientation if needed.

Disassemble; coat fittings with flux; reassemble.

Light torch;, heat pipe at joint with the tip of the flame. When the solder melts easily as you touch it to the pipe, remove torch and move solder around the joint as best you can, then remove solder and let it draw up into joint as it cools. Do the next joint.

Pressure test before walling off or flooring over joints. It is really really easy to do and a solid joint when done. Cheaper, too.
 
Last edited:
Success!

Sprayed the outer ring of the drain valve a couple times yesterday. Then again today. Picked up one of these for $11 at the local Hardware store

1d99c3e1-d7f2-445a-bacb-d99539876d1d_400.jpg


Put a wrench on it and gave it a couple good hard pulls and it spun free like it was greased with butter!

Very happy! :db
 
Glad to hear its not giving you too many issues, hope the rest of the project is this smooth
 
Got the new valve installed without much too much difficulty. The only problem I had was with the cold water line. It was twisted around the stack pipe. Could not get a "real" pipe cutter in there and had to use one of the mini ones. They just don't cut as well. Plus the Shark Bite fittings need a very straight piece of pipe and this stuff was way less than straight. I think I cut it 5 times to get down to a straight enough section where the fitting held tight. Will leave it open for a few days and work on other things. Want to leave it open for just a bit before closing it in and starting to seal it all back up.

photo2.jpg
 

Latest posts

Back
Top